Sonicake Pocket Master: NAM models, effects and acoustic guitar IR on the cheap

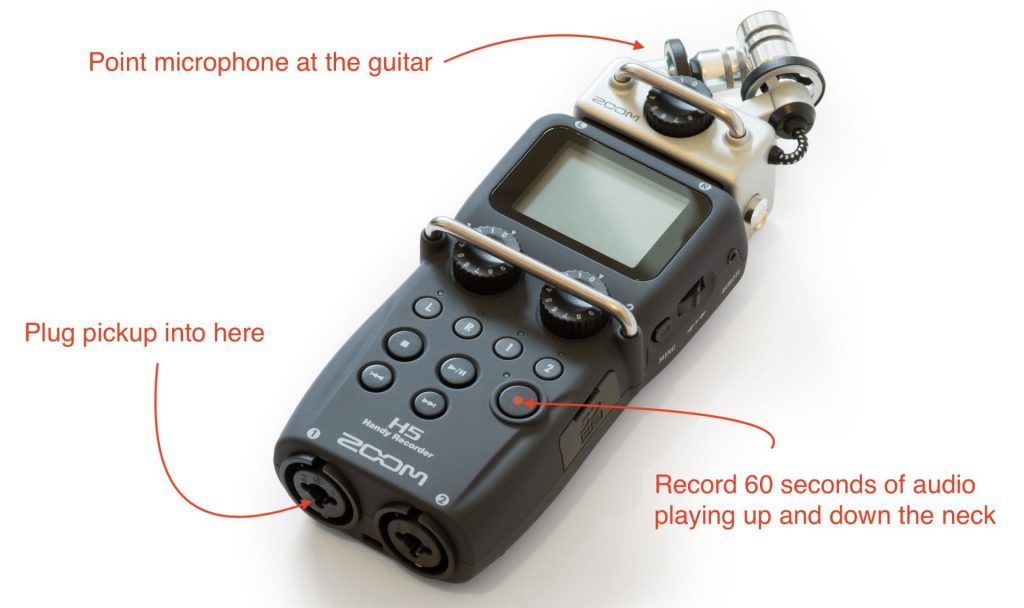
I’ve brought up IR tech for acoustic guitarists and NAM amp modeling and a lot has changed since then!

I used to think you had to buy an expensive pedal like the Fishman Aura, Nux Optima Air, or Tonedexter for acoustic IRs. There are pricey solutions for loading NAM amp profiles, such as the Dimehead NAM player.

But this tech is starting to make its way into low-cost devices from China. Two such devices are the $65 Sonicake Pocket Master or it’s beefed up big brother the $95 Sonicake Smart Box (affiliate links). I think this thing is a real sleeper. It’s essentially a amp modeler with very decent presets (though mostly for metalheads) and also a multi-effects unit (all the standards: distortion, boost, phaser, flanger, tremolo, delay, reverb) in a very compact, rechargeable battery-powered box:

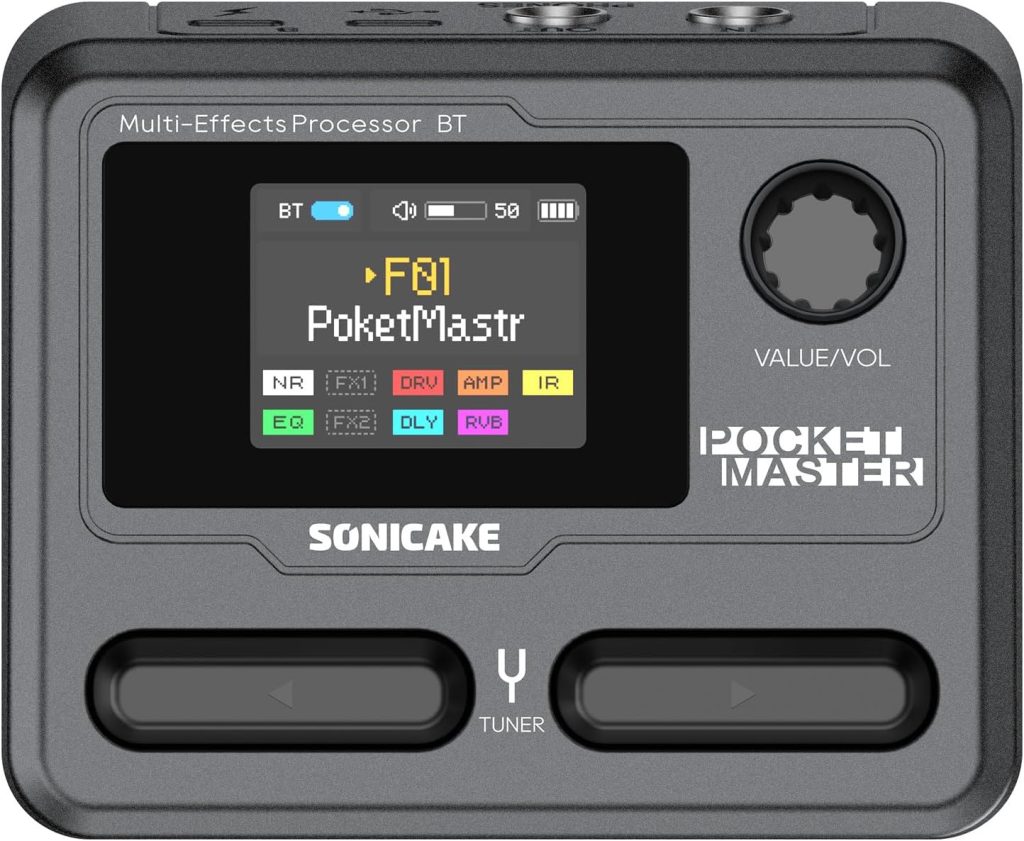
The onboard stuff is pretty handy, but the most recent firmware for the Pocket Master added up to 5 NAM and 5 IR profiles. So you can load up custom amp models from Tone3000 and your acoustic IR profiles in one box. I’ve been using it to load up an EH-150 amp model for Charlie Christian / Oscar Moore-style archtop playing, and also have a setting for my Gypsy Jazz acoustic guitar IR for acoustic gigs, running into my AER.

I find the internal battery really convenient, because it cuts down on the cable clutter. Also, if I’m feeling really lazy about schlepping amps around town, it sounds surprisingly good running direct into a mixing board. Even my discerning bandmates thought so!

A few tips on using the Pocket Master

  • Volume issues with loaded models: If you load NAM profiles, go with an older software version 1.1.1, and not 1.3.3+, from Sonicake’s web site. The newest version has issues loaded amp/IR profiles are too quiet. You can sort of get around this by adding some volume boosts to the effects chain (boost, EQ, gain settings), but best to get it in there as loud as possible first.
  • Loading acoustic IRs: To load an acoustic guitar IR, similarly use the Sonicake Manager app to put them in to one of the five IR slots, which usually are used for Cabinet simulation, but in our case we just want them for acoustic guitar. Then make a new preset where you disable the amp modeler in the effects chain. This essentially makes it a simple acoustic guitar IR loader. You can add additionally add some EQ and reverb to the effects chain to get it closer to the desired sound.
  • Effects triggers: you might want to be able to easily toggle effects. The M-Vave Chocolate Plus (affiliate link) adds 4 additional configurable buttons that can be set up to do so.
  • Battery life: If you’re finding the onboard battery a bit lacking (I found that it cuts out around 2.5 hours). You can just use a mobile power bank with USB-C to give it a boost. Also, consider this internal battery upgrade I developed to bump it through a 3-hour gig! Will require a 3d printer. Instructions at Printables.

Note that I’m not shilling for Sonicake at all! I discovered this on my own and I just think it’s crazy what the crammed in this little box. As someone who makes a lot of gadgets to suit my niche purposes, there’s no way I could ever create something that checks all these boxes.

How to make your own acoustic guitar IRs (the easy way)

As I have covered before, acoustic guitar IRs can greatly improve the sound of a piezo pickup. They work by converting the EQ of the base pickup sound to that of a microphone using some complicated math.

See this video for some before and after samples:

You can load IRs into fancy, expensive pedals like the Tonedexter, Nux Optima Air, and Fishman Aura, but really anything that can load an IRs does the job. There are plenty of cheaper solutions out there, like the TC Electronic Impulse IR Loader pedal or even the Sonicake Pocket Master.

Using another person’s IRs is probably not ideal since their source pickup and guitar is different. To get the best result you need to record your own guitar, pickup, and microphone. The expensive pedals have the inputs and setup features to handle this for you. But if you go with a cheaper pedal, you’ll need to do it yourself. This means you must supply source audio files of your rig and then process them with some tools like Cuki’s IR Generator to output a wav file that you can load to your hardware. It’s not a simple process at all. But hopefully this guide along with some web-based tools I’ve developed will help.

Recording your acoustic rig

The main requirements for generating an IR file are two recordings:

  • An audio signal of your acoustic guitar’s pickup
  • A recording of your acoustic guitar through a microphone of your choice

I recommend recording 60 seconds of playing up and down the neck to capture the full range of your instrument: chords, harmonics, single note scales.

The tricky part is the two recordings need to be playing the exact same performance, so you will need a way to record two channels simultaneously. This can be achieved with a 2-channel recording interface, or a multi-track recorder.

Recording with a recording interface into a DAW

If you have a decent recording interface and computer, plug in the pickup to channel 1, and the microphone into channel 2 of the interface.

Record the 60 second sample on both channels simultaneously into a DAW like Garageband or Audacity. Check to make sure the recording levels are roughly equal on each, and sufficiently loud without clipping.

Once you have the recording, the benefit of using a DAW is that you can further EQ or add some additional processing the to the target microphone track to get the tone exactly how you like it. When you’re done, bounce each track to a separate mono wav file.

Recording with a standalone multi-track device

I happen to have a Zoom H5 field recorder, which can record multiple tracks at once, so that worked for me. You can even use the onboard microphone. I plugged in the pickup directly to one of the free channels, recorded both the microphone (pointed at the 12th fret) and the pickup.

After recording the 60 second sample, I pulled the two mono wav files off the SD card and was ready to move to the processing step.

Processing the source files into an IR

This is the really difficult part for non-technical folks, but luckily for you I have noticed how clunky the current solutions are and have developed a simple web tool that makes it much easier.

Vic’s IR Generator

Visit this website: Vic’s IR Generator. Note that this site is hosted on a free tier on Render, so might take a bit to load for the first time (50 seconds or so). Once loaded, it looks like this. Drag and drop your two source wav files into the “Source Audio” section like so:

In the “Configuration” section, you can choose either my vibe-coded algorithm “Standard (Original)” or the gold standard “Cuki’s algorithm” from the dropdown. Probably best to leave the other settings alone for now. Then click “Generate Impulse Response”.

After some time, you’ll get a graph indicating the accuracy of the IR compared to the microphone, and a download link:

The wav file is your IR. It’s sounds like nothing more than a simple “knock” sound, but it includes all the frequency transformation information an IR processor needs to translate the pickup to the microphone sound. Load this file into the IR loader of your choice and give it a spin!

If you don’t like the sound, you can tweak mic placement, mic type (I actually like dynamic mics better), and some EQ in the DAW before sending it to the IR processing tool. Note that “accurate” does not necessarily equate to “sounds good”. Experiment!